
How to Write HTML Calculator Code- Creating a simple calculator using React is an excellent way to practice state management and event handling in a real-world scenario. This guide will explore how to build an HTML calculator in React with a smooth and modern UI.
Understanding the Code Structure
The calculator consists of two main parts:(How to Write HTML Calculator Code )
- App.js: The core React component managing state and button interactions.
- App.css: The styling file responsible for the calculator’s modern look.
Breakdown of App.js
- State Management (
useState): Controls the input value of the calculator. - Event Handling (
onClick): Captures button clicks and updates the display. - Evaluation (
eval()): Executes mathematical calculations when the = button is pressed.
Key Features (How to Write HTML Calculator Code)
- User-Friendly Interface: Simple and clean design with responsive buttons.
- Real-Time Calculations: Users can input expressions and get instant results.
- Smooth Animations: Button clicks have visual feedback with inset and shadow effects.
- Error-Free Execution: Supports backspace (DE) and full reset (AC) functionality.
Code Walkthrough
App.js (Calculator Logic)
import React, { useState } from 'react';
import './App.css';

function App() {
  const [value, setValue] = useState('');

  return (
    <div className="container">
      <div className="calculator">
        <form>
          <div className='display'>
            <input type="text" value={value} readOnly />
          </div>
          <div>
            <input type="button" value="AC" onClick={() => setValue('')} />
            <input type="button" value="DE" onClick={() => setValue(value.slice(0, -1))} />
            <input type="button" value="." onClick={e => setValue(value + e.target.value)} />
            <input type="button" value="/" onClick={e => setValue(value + e.target.value)} />
          </div>
          <div>
            <input type="button" value="7" onClick={e => setValue(value + e.target.value)} />
            <input type="button" value="8" onClick={e => setValue(value + e.target.value)} />
            <input type="button" value="9" onClick={e => setValue(value + e.target.value)} />
            <input type="button" value="*" onClick={e => setValue(value + e.target.value)} />
          </div>
          <div>
            <input type="button" value="4" onClick={e => setValue(value + e.target.value)} />
            <input type="button" value="5" onClick={e => setValue(value + e.target.value)} />
            <input type="button" value="6" onClick={e => setValue(value + e.target.value)} />
            <input type="button" value="+" onClick={e => setValue(value + e.target.value)} />
          </div>
          <div>
            <input type="button" value="1" onClick={e => setValue(value + e.target.value)} />
            <input type="button" value="2" onClick={e => setValue(value + e.target.value)} />
            <input type="button" value="3" onClick={e => setValue(value + e.target.value)} />
            <input type="button" value="-" onClick={e => setValue(value + e.target.value)} />
          </div>
          <div>
            <input type="button" value="00" onClick={e => setValue(value + e.target.value)} />
            <input type="button" value="0" onClick={e => setValue(value + e.target.value)} />
            <input type="button" value="=" className='equal' onClick={() => setValue(eval(value))} />
          </div>
        </form>
      </div>
    </div>
  );
}

export default App;
App.css (Styling the Calculator)
.container {
  display: flex;
  justify-content: center;
  align-items: center;
  height: 100vh;
  background-color: white;
}
.calculator {
  width: 300px;
  background: #e0e0e0;
  padding: 20px;
  border-radius: 30px;
  box-shadow: 10px 10px 20px #bebebe, -10px -10px 20px #ffffff;
}
form input {
  width: 60px;
  height: 60px;
  border-radius: 10px;
  font-size: 18px;
  box-shadow: inset 3px 3px 6px #bebebe, inset -3px -3px 6px #ffffff;
  cursor: pointer;
}
form input:active {
  box-shadow: inset 5px 5px 10px #bebebe, inset -5px -5px 10px #ffffff;
}
OUTPUT :
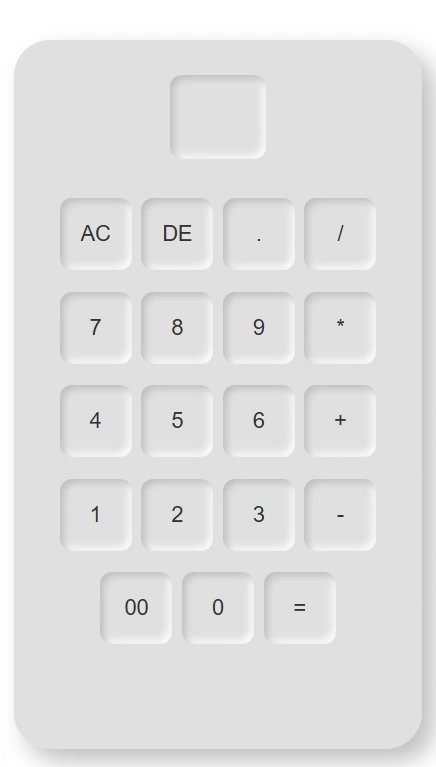
Example: How to Write HTML Calculator Code (in React)
| Button Pressed | Display Output |
|---|---|
| 7 | 7 |
| + | 7+ |
| 3 | 7+3 |
| = | 10 |
| AC | (Clears Display) |
| DE (Backspace) | Removes Last Character |
Frequently Asked Questions (FAQ)
The eval() function executes the string as a mathematical expression. If the expression is incomplete, it can cause an error. Consider adding error handling using try-catch to avoid crashes.
Yes! Using Function() is a safer approach:setValue(Function('use strict'; return (${value}))());
you can add keyboard support for input. Implement themes (light/dark mode) and
Use react-hooks for better state management.1
Conclusion
Building an HTML Calculator in React is a fantastic way to sharpen your React skills. This guide walked you through the process of creating a fully functional and beautifully styled calculator from scratch. With a few improvements, you can turn this into an even more powerful and interactive tool!