

Login Form in React JS– A login form in React JS is an essential component in any web application that requires user authentication. In this guide, we’ll explore how to create a simple login form using React, useState, and CSS for styling. We’ll also discuss best practices to improve security and user experience.
Introduction to Login Forms in React JS
A login form allows users to access a protected part of a web application by entering credentials. In React JS, we use the useState hook to manage the input fields, and event handlers to capture form submission.
Setting Up a Simple Login Form in React
To create a login form in React JS, follow these steps:
- Create a new React project using npx
create-react-applogin-app. - Inside the
srcfolder, create aLogin.jsfile. - Import
useStateto handle the form input values. - Use the
onSubmitevent to handle form submission.
Understanding useState for Managing State
React’s useState hook helps manage input values dynamically. In our login form, we’ll use useState for email and password fields.
Example Code:
import React, { useState } from "react";
import "./App.css";

const Login = () => {
    const [email, setEmail] = useState("");
    const [password, setPassword] = useState("");

    const handleSubmit = (e) => {
        e.preventDefault();
        console.log("email:", email, "password:", password);
        alert("Login successful");
    };

    return (
        <div className="container">
            <form className="login-form" onSubmit={handleSubmit}>
                <h2>Login</h2>
                <input type="email" placeholder="Email" value={email} onChange={(e) => setEmail(e.target.value)} />
                <input type="password" placeholder="Password" value={password} onChange={(e) => setPassword(e.target.value)} />
                <button type="submit">Submit</button>
            </form>
        </div>
    );
};

export default Login;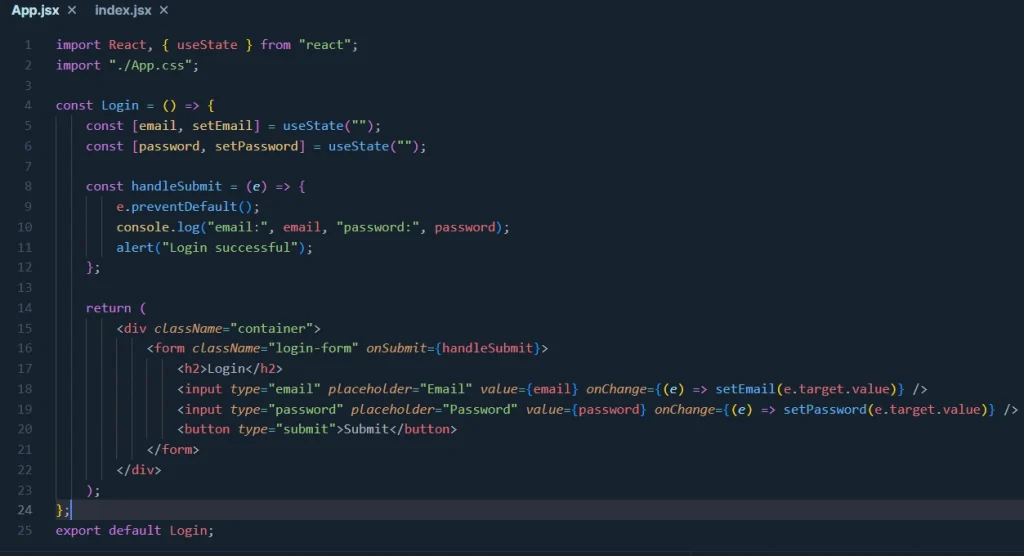
Enhancing User Experience with CSS
Good UI/UX improves engagement. Below is the CSS to style our form using the neomorphism effect.
body {
    display: flex;
    justify-content: center;
    align-items: center;
    height: 100vh;
    font-family: sans-serif;
    background: #e0e0e0;
}
.container {
    display: flex;
    justify-content: center;
    align-items: center;
    height: 100%;
}
.login-form {
    background: #e0e0e0;
    padding: 40px;
    border-radius: 20px;
    box-shadow: 10px 10px 20px #bebebe, -10px -10px 20px #ffffff;
    text-align: center;
    width: 300px;
}
input, button {
    width: 100%;
    padding: 10px;
    margin-top: 10px;
    border-radius: 10px;
    border: none;
    background: #e0e0e0;
    box-shadow: inset 5px 5px 10px #bebebe, inset -5px -5px 10px #ffffff;
    font-size: 16px;
}
button:hover {
    cursor: pointer;
}
OUTPUT
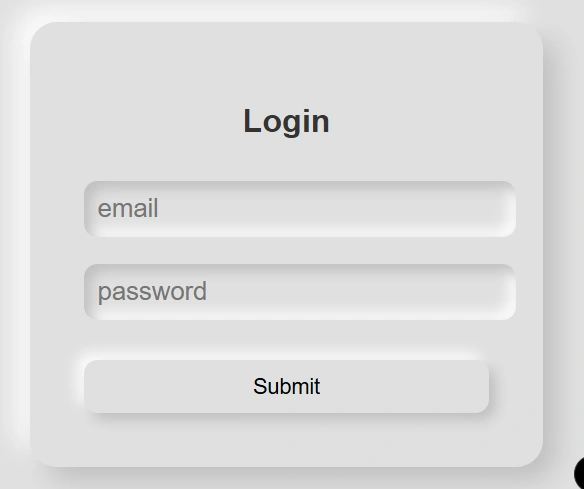
Example Login Form Code
Here’s a complete example including both the React component and CSS styling:
| Feature | Implementation |
|---|---|
| State Management | useState Hook |
| Form Handling | onSubmit Event |
| UI Styling | CSS Neumorphism |
| Input Fields | Email & Password |
| Button Styling | Smooth UI Interaction |
This simple login form in React JS can be expanded to include authentication using Firebase or JWT.
FAQs
How do I validate the login form?
Use JavaScript validation or React Hook Form to ensure inputs are correct before submission.
Can I add password visibility toggle?
Yes! Use useState to toggle the password field type between password and text.
How to handle authentication in React?
You can use Firebase, JWT, or OAuth to authenticate users securely.
What happens after a user logs in?
Usually, users are redirected to a dashboard or protected page after successful login.
Can I use Tailwind CSS instead of traditional CSS?
Absolutely! Tailwind CSS simplifies styling and offers better flexibility.
With these steps, you now have a fully functional login form in React JS that is stylish, efficient, and easy to expand!